PyMOL - 开源版本安装
1.商业版本安装(Incentive PyMOL)
直接到Schrödinger官网去下载(exe版本)就能安装,地址:https://www.schrodinger.com/suites/pymol
2.开源版本安装(Open-Source PyMOL)
更新时间:20210421
开源的PyMOL是不收费的,可以应用到各个场景而没有限制,但是并没有可以用的MSI安装包,所以我们只能通过编译源码包来安装,但是对于没有基础的人来说,这样做有点麻烦。
源码包地址:https://sourceforge.net/projects/pymol/files/?source=navbar。
这里我们介绍一个基于Python包的安装方法:
第一步:安装Python,这里我推荐大家安装Anaconda软件,这个软件安装后就相当于Python安装完成,并且帮我们安装上了很多科学计算必须的包,比如Numpy,Panda等。同时这个软件还可以构建多个Pythonb版本(2.7,3.5,3.6)。或者我们可以使用Miniconda,它相当于Anaconda的精简版,只保留基础的内容。这里我们使用python3.8版本的Miniconda3.
注意:一般安装完成后的Python中包括了pip,wheel,如果没有请手动安装

下载各个Python安装包,这里格式是wheel文件,具体介绍可以在这里看(https://blog.csdn.net/deranotoo/article/details/53400098),当前我们主要的包是:
# python版本是3.8 # 由于我系统是64位,因此这里尽量下载64位版本的包amd64 # 1. PyMOL https://www.lfd.uci.edu/~gohlke/pythonlibs/#pymol-open-source pymol‑2.5.0a0‑cp38‑cp38‑win_amd64.whl # 运行PyMOL必须的包 # 2. Numpy https://www.lfd.uci.edu/~gohlke/pythonlibs/#numpy numpy‑1.20.2+mkl‑cp38‑cp38‑win_amd64.whl # 3. PMW https://www.lfd.uci.edu/~gohlke/pythonlibs/#pmw Pmw‑2.0.1‑py3‑none‑any.whl # 上述地址失效,可以在以下地址下载对应python版本的包 pymol:https://github.com/cgohlke/pymol-open-source-wheels/releases numpy:https://pypi.tuna.tsinghua.edu.cn/simple/numpy/ Pmw:https://pypi.tuna.tsinghua.edu.cn/simple/pmw/
安装上述的几个包:
#在命令行下,原生的Python用cmd,Miniconda的用其自带的Anaconda Prompt程序(类似cmd)
#切换到安装目录下,安装目录是:D:\PyMOL_installation
<> D:
<> cd PyMOL_installation
<> dir #显示当前目录下的文件
<> pip install "numpy‑1.20.2+mkl‑cp38‑cp38‑win_amd64.whl"
<> pip install "Pmw‑2.0.1‑py3‑none‑any.whl"
<> pip install "pymol‑2.5.0a0‑cp38‑cp38‑win_amd64.whl"
#至此已经安装完成了,后续只要在命令行界面输入pymol回车就能运行PyMOL
<> pymol
#PyMOL程序所在目录
<> C:\Users\cxt\miniconda3\Scripts\pymol.exe

如何直接打开一个PDB文件:初始,我们没有将pdb格式文件与PyMOL关联,因此并不能直接打开,需要我们通过下面这个程序给去设置,而我们的PyMOL程序的地址是:
后续的图片不对应,但是过程是一样的
1)打开一个文件
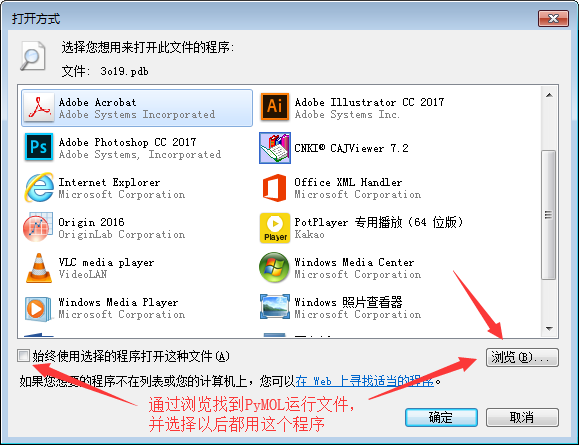
2)选择打开这个文件的程序,以后就能直接打开每一个pdb格式文件,也就是蛋白文件

3.扩展PyMOL功能
如果我们想扩展PyMOL的功能,那么脚本和插件将会是其中重要的一环,那么关于脚本的安装如果下:
首先确保你的python安装了numpy模块
然后下载Python的脚本,下载地址是:https://github.com/Pymol-Scripts/Pymol-script-repo/zipball/master
注意:下载的是一个zip文件,直接将地址粘贴在浏览器上回车就能下载
上述的下载,也可以通过git实现:
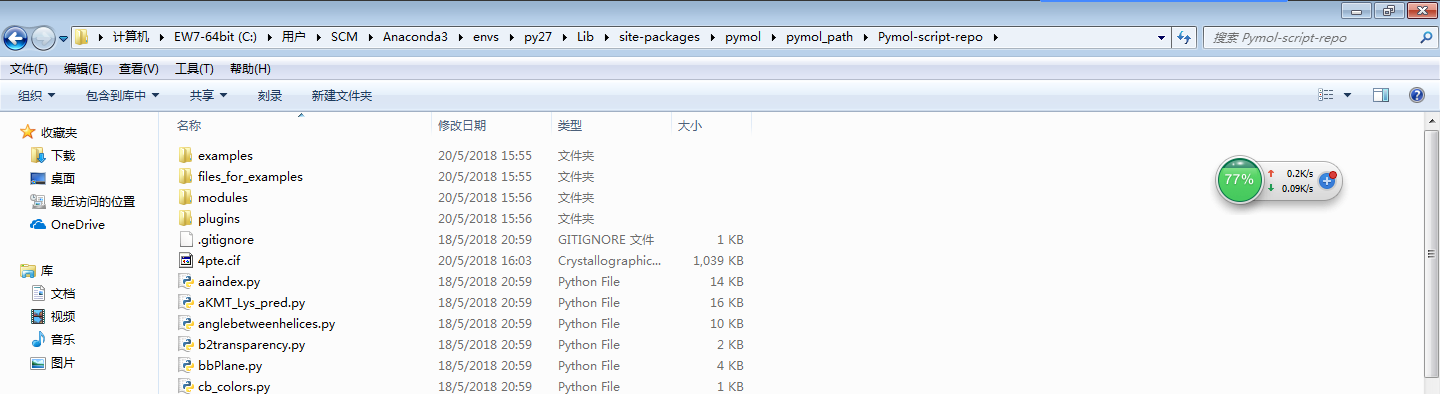
git clone https://github.com/Pymol-Scripts/Pymol-script-repo下载后,将上述压缩包解压到下面目录下:C:\Python27\Lib\site-packages\pymol\pymol_path\Pymol-script-repo
注意
1)如果你的压缩包中是一个文件夹,请在解压后将文件夹名称修改为Pymol-script-repo,并且这个文件夹的目录是: C:\Python27\Lib\site-packages\pymol\pymol_path\
2)“C:\Python27\”这个地址根据你的Python地址来,比如我的就是:C:\Users\SCM\Anaconda3\envs\py27\Lib\site-packages\pymol\pymol_path
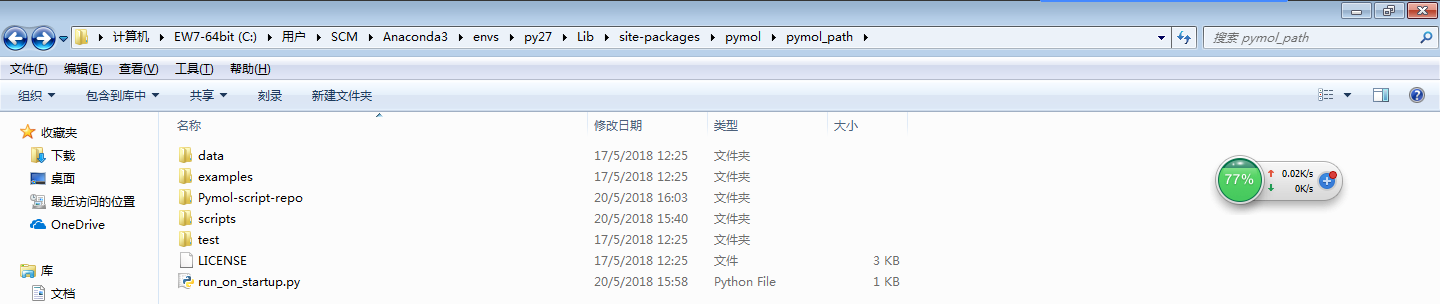
然后,打开Notepad之类的文本编辑器,复制下面的内容,然后将文件保存为Python文件,并命名为“run_on_startup.py”,文件的保存目录为:C:\Python27\Lib\site-packages\pymol\pymol_path\
# Add paths to sys.path so PyMOL can find modules and scripts import sys, os pymol_git = os.path.abspath(os.path.join(os.environ['PYMOL_PATH'], 'Pymol-script-repo')) os.environ['PYMOL_GIT_MOD'] = os.path.join(pymol_git,'modules') sys.path.append(pymol_git) sys.path.append(os.environ['PYMOL_GIT_MOD']) # Make setting changes to Plugin Manager import pymol.plugins pymol.plugins.preferences = {'instantsave': False, 'verbose': False} pymol.plugins.autoload = {'apbs_tools': False} pymol.plugins.set_startup_path([os.path.join(pymol_git, 'plugins'), os.path.join(sys.prefix, 'Lib', 'site-packages', 'pmg_tk', 'startup')]) pymol.plugins.preferences = {'instantsave': True, 'verbose': False}完成后的文件如下,现在可以开始使用Python的脚本了:
4.扩展案例:测定蛋白体积
这里,我们将使用脚本“Draw_Protein_Dimensions.py”来测定我们的蛋白的体积,具体步骤如下:
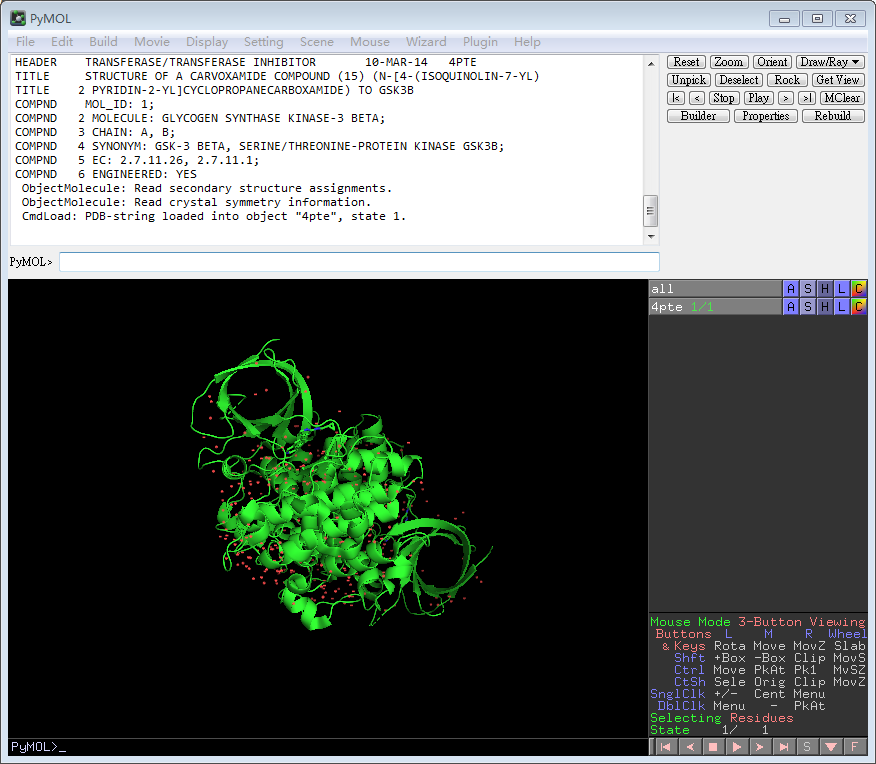
打开一个pdb文件,如4PTE.pdb,如下:
安装我们的脚本插件,具体操作如下:
1)首先打开菜单栏中的Plugin,在打开Plugin Manager,然后在Install New Plugin中打开Choose file...,选择我们的脚本。
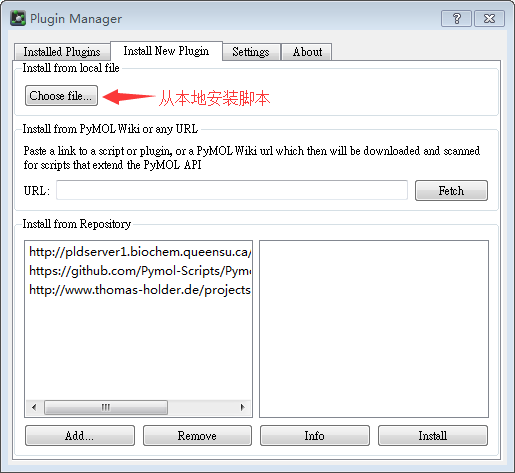
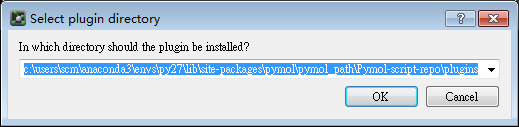
2)打开后,切换到我们的脚本目录,就是Pymol-script-repo目录,然后选择我们的脚本,后续保存就默认就行。

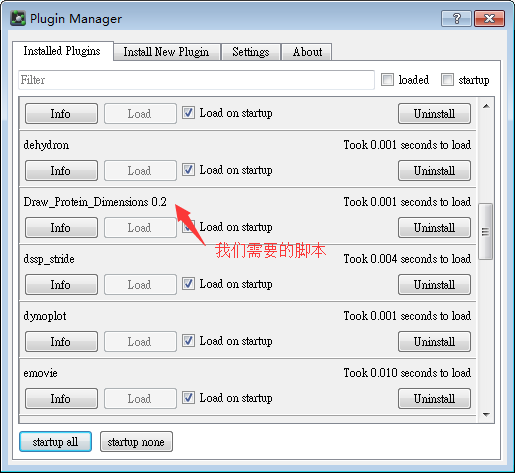
3)这样我们的脚本就按照成功了。
使用我们的脚本测定蛋白的体积,步骤如下
1)首先在命令行中输入如下命令“draw_Protein_Dimensions 4pte”
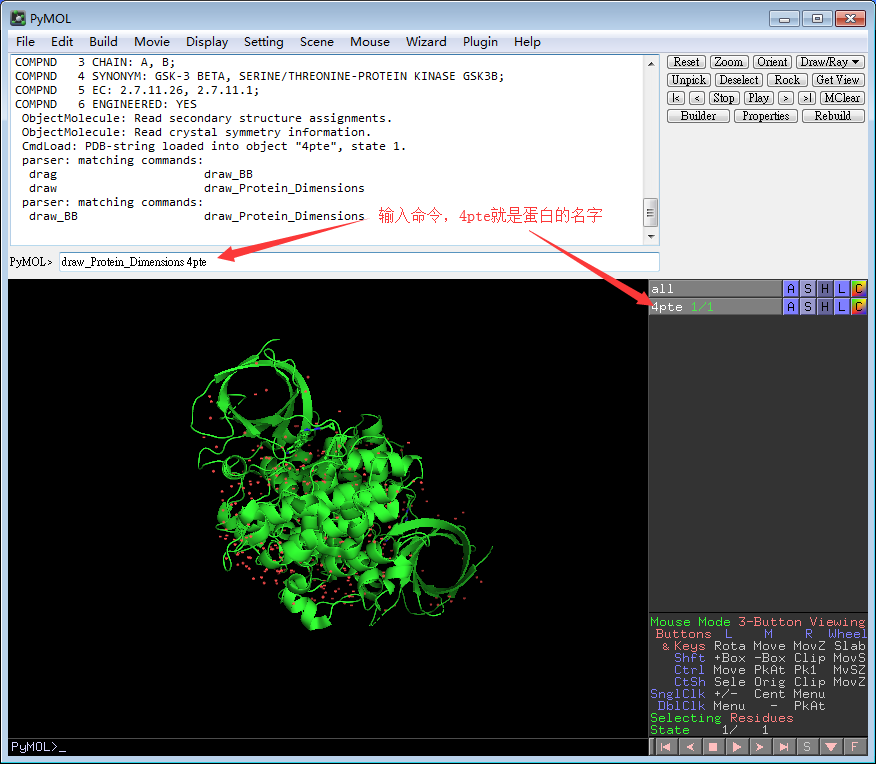
2)回车,获得我们的结果:
The Inertia Axis Aligned Bounding Box (IABB) dimensions are (95.08, 64.63, 47.86)
The Inertia Axis Aligned Bounding Box (IABB) volume is 294056.63 A3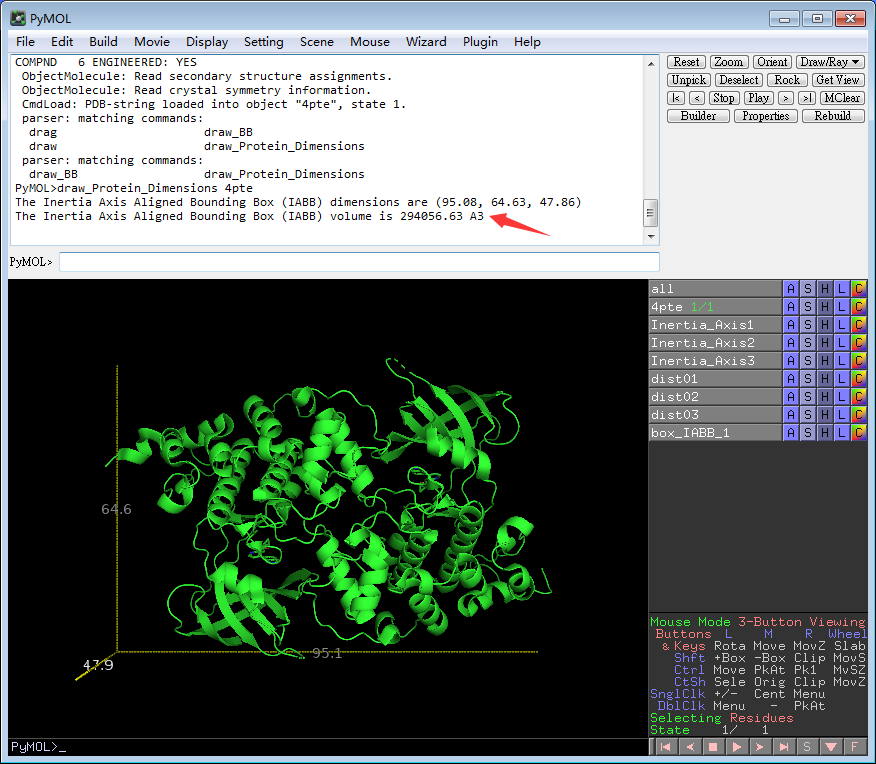
3)IAAB概念补充,可以去看脚本的说明(https://pymolwiki.org/index.php/Draw_Protein_Dimensions):
This script will draw the dimensions of a protein based on an Inertia Axis Aligned Bounding Box (IABB).
The idea behind this script is to calculate an approximate minimal bounding box (MBB) to extract the cell dimensions of a protein. To calculate the MBB is not trivial and usually the Axis Aligned Bounding Box (AABB) does not show up the real dimensions of the protein. This script calculates the inertia tensor of the object, extract the eigenvectors and use them to rotate the molecule (using as rotation matrix the transpose of the eigenvector matrix). The result is a molecule oriented with the inertia axis aligned with the cartesian axis. A new Bounding Box is calculated, which is called Inertia Axis Aligned Bounding Box (IABB), with a volume always lower than the AABB volume, and in many cases may correspond with the MBB.
4)埃米Å的概念(https://baike.baidu.com/item/%E5%9F%83%E7%B1%B3/9584915?fr=aladdin)
参考文献
说明:实际上Windows和Linux差不多,当前教程参考这个版本的教程:https://pymolwiki.org/index.php/Windows_Install
- 感谢你赐予我前进的力量
-
 微信
微信  支付宝
支付宝